Page 1 of 2 12 LastLast
Results 1 to 10 of 20

Thread: 2014 - Image of the Week #27

Hybrid View

Previous Post Previous Post   Next Post Next Post
  1. #1
    Super Moderator Kayaker72's Avatar
    Join Date
    Jan 2009
    Location
    New Hampshire, USA
    Posts
    5,665

    2014 - Image of the Week #27

    This entry period for Week 27 will be from Monday June 30th through/including Sunday July 6th.

    Only two categories of images will be judged:


    1. Portraits -- Anything with eyes; people or animals
    2. Landscape -- Country, town, city, sea, abstract, things (water drops, smoke, flowers, candles, and so on)


    Each category will have a single winner each week. This week will be judged by Jerrytech1

    Please supply a title for your image and which category it is entering. Enter as many times as you would like, old or new images.

    Good luck!!

  2. #2
    Senior Member Jayson's Avatar
    Join Date
    Jan 2009
    Location
    Nebraska, USA
    Posts
    1,908
    Portrait "bubbles"

    Little guy is only 3 months old so we needed a Bumbo.


  3. #3
    Senior Member Jayson's Avatar
    Join Date
    Jan 2009
    Location
    Nebraska, USA
    Posts
    1,908
    Landscape "Simple"


  4. #4
    Senior Member Jonathan Huyer's Avatar
    Join Date
    Jan 2009
    Location
    Canmore, Alberta
    Posts
    1,263
    Portrait - Great Horned Owl family (there's always one kid who tries to ruin a picture)


  5. #5
    Zach
    Guest
    This is a portrait of my mothers miniature wirehaired dachshund.

    "Bucky"

  6. #6
    Super Moderator Kayaker72's Avatar
    Join Date
    Jan 2009
    Location
    New Hampshire, USA
    Posts
    5,665
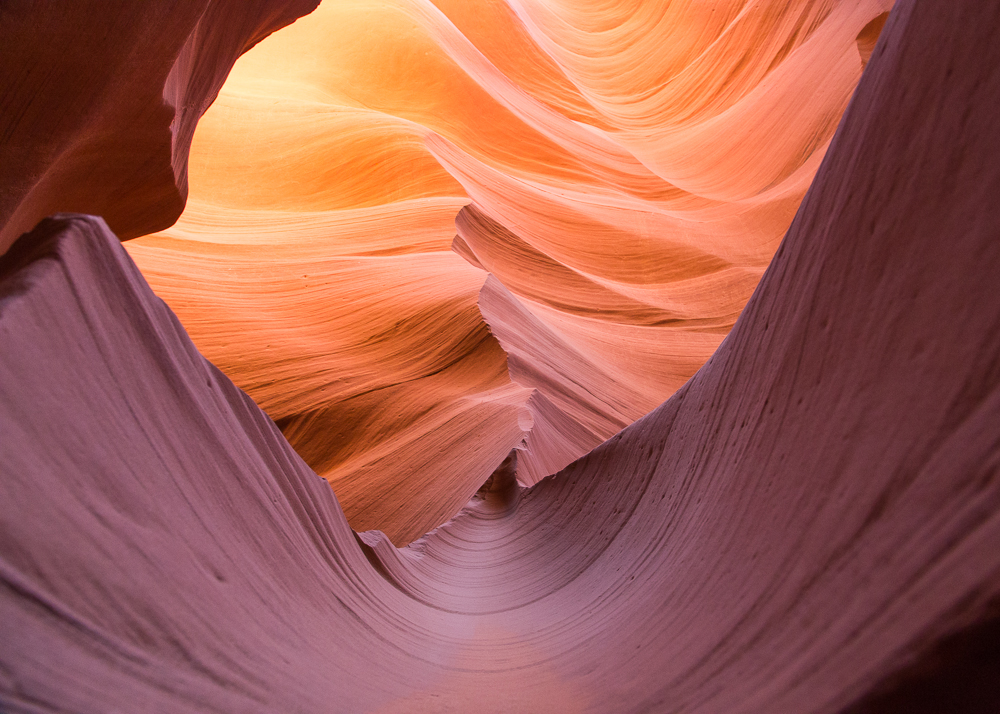
    Landscape. "Rock Dunes"

    Small-7644 by kayaker72, on Flickr

    5DIII, 24-105 @ 24 mm, 1/40, f/8, ISO 2500 with Singh Ray Warmer up CPL

    Taken inside Lower Antelope Canyon just outside Page, Arizona.

  7. #7
    Senior Member Tounis's Avatar
    Join Date
    Oct 2012
    Location
    Switzerland
    Posts
    269
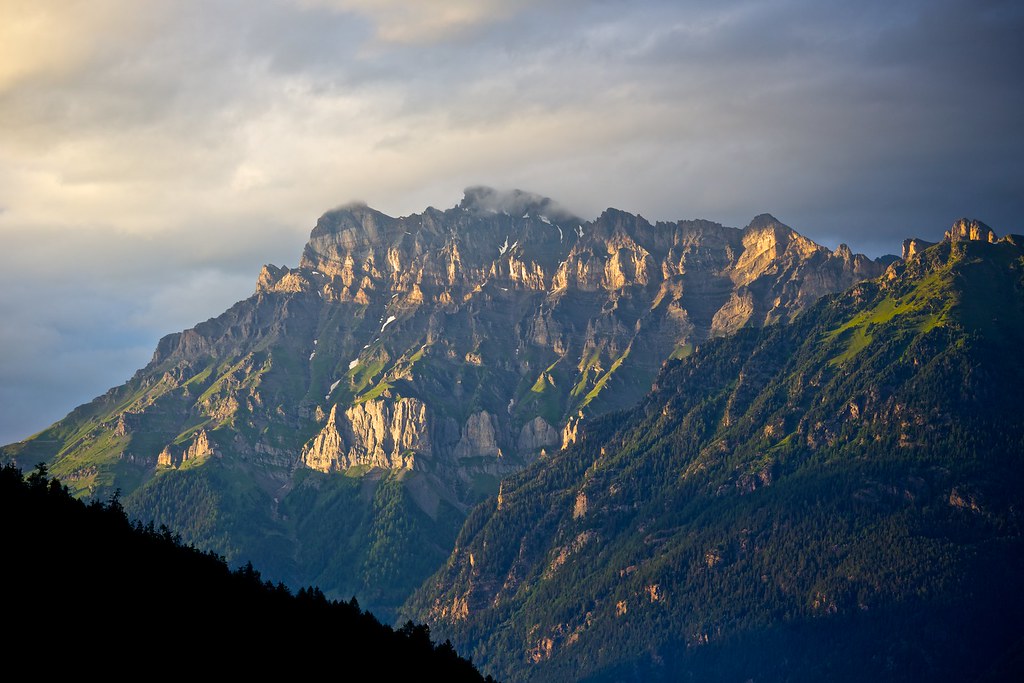
    I posted this one in the "Post your best landscape" thread, and then I realized I've not been participating in this weekly contest for some time now. So here's my entry in the landscape category. Sorry for the double post.


    Evening light on the Dents de Morcles by Tounis_9, on Flickr

  8. #8
    Senior Member conropl's Avatar
    Join Date
    Jan 2009
    Location
    West Michigan
    Posts
    1,466
    Took this last night. I am new to layers and was experimenting a little... hopefully I did not overdo it.

    Landscape: Milky Way Over Lake


    Milky Way Over Lake 4301 by westmichigan, on Flickr
    5DS R, 1D X, 7D, Sigma 10-20mm f/4-5.6, 24mm f/1.4L II, 16-35mm f/4L IS, 24-105mm f/4L, 50mm f/1.8, 100mm Macro f/2.8L, 70-200mm f/2.8L IS II, 100-400mm f/4.5-5.6L, 580EX-II
    flickr

  9. #9
    Senior Member Photog82's Avatar
    Join Date
    Mar 2012
    Location
    Maine, USA
    Posts
    321
    Quote Originally Posted by conropl View Post
    Took this last night. I am new to layers and was experimenting a little... hopefully I did not overdo it.

    Landscape: Milky Way Over Lake


    Milky Way Over Lake 4301 by westmichigan, on Flickr


    Very nice, I'd like to read about your process as I want to attempt this summer up to camp.
    --

  10. #10
    Senior Member conropl's Avatar
    Join Date
    Jan 2009
    Location
    West Michigan
    Posts
    1,466
    Congratulations to the winners this week... good choices.

    Quote Originally Posted by Photog82 View Post
    Very nice, I'd like to read about your process as I want to attempt this summer up to camp.
    Here is the basics of what I do, but keep in mind I just recently got Photo Shop for the first time (CS6), and this was my first real attempt at using layers (trust me... there are people here who are way better than me at this). I also did it on my laptop which sucks at determining brightness because it depends on the angle of view to the screen. When I got home I see that it is a little to dark and some of the detail was lost. The camera side of things I am comfortable with - the processing side I am a work in progress. So here is my current method (but always open to experimentation):
    1. My camera/Lens Combination
      • Canon 1D X (any high ISO capable camera would do - such as 6D, 5D II, or 5D III)
      • EF 24mm f/1.4L II (you can get away with a f/2.8 lens if it is wider because you can lengthen the exposure time w/o elongating the stars).

    2. Camera Set-Up/Setting
      • Turn on mirror lock up
      • I do not use any of the in-camera NR (all set to - OFF)
      • Cover Eye piece so light does not enter
      • Max shutter speed = 500/(focal length). If you go beyond this shutter speed, then the stars will start to be visibly elongated and they do not look as sharp. In my case my max shutter speed is 20 seconds... sometimes I will cheat and push it to 25 seconds if the ISO is getting to high.
      • I set the aperture to f/2. I cannot go wide open because of the loss of sharpness. If you use something like an f/2.8 lens wide open, then it needs to be much wider to get the same exposure. f/2.8 is a stop smaller than what I use and requires double the exposure time or 40 seconds - so a 12-14mm f/2.8 could work without pushing the ISO higher.
      • I set the ISO to 3200 and it came out a little light and had to darken it a little. 1600 is a little to low. Personally I would stick with 3200 ISO for a good dark night.
      • Set to Bulb
      • Use a remote. I use an Intervolometer so I can accurately set the shutter speed.
      • Shut off A/F and manually focus on a star at 10X magnification. Probably best to put a star in the center of the frame for best results. Take a test shot and magnify the preview to make sure you have it right.
      • Compose and use the electronic level if you have one because composing in the dark is tough. Take a test shot and check the composition. Adjust as needed.
      • Use histogram during review to make sure it is not clipping the darks.
      • Shut off A/F and manually focus on a star at 10X magnification. Take a test shot and magnify the preview to make sure you have it right.
      • Shoot RAW
      • Use a very steady tripod and head - do not extend center column if it has one; remove camera and tripod straps so they do not blow in the wind; I set the tripod in the water so I pushed down in the mud until it hit hard ground.

    3. Processing (RAW Conversion):
      • Noise can get out of hand quickly. You need to be careful to not push contrast, exposure adjustments, shadow recovery, etc. to much or it will drive to noise issues further. So adjust sparingly in your favorite RAW converter.
      • Go through luminance adjustments to reduce some of the unwanted colors in the stars (red mostly), and bring the blues up a little to help the look of the sky.
      • In LR and PS you can mask the sharpening (Alt-Mask under the sharpening tool and adjust so all the dark areas are masked and only the starts are sharpened). This probably does more to cut down the noise in the shadows that anything else.
      • NR should be the last thing you do in RAW conversion.

    4. Processing (Photo Shop):
      • I made multiple adjustment layers for contrast, color, brightness, etc. Each was masked for either the foreground or the sky and the opacity adjusted to taste. Each of those layers was performed for both the foreground and sky.
      • I finally added a Gaussian blur to a layer to just the foreground because the shadows were getting noisy. This was applied to a layer and masked to apply to the foreground only. The amount was just a little past eliminating noise, and then adjust the opacity to get the balance of sharpness and noise.
    5DS R, 1D X, 7D, Sigma 10-20mm f/4-5.6, 24mm f/1.4L II, 16-35mm f/4L IS, 24-105mm f/4L, 50mm f/1.8, 100mm Macro f/2.8L, 70-200mm f/2.8L IS II, 100-400mm f/4.5-5.6L, 580EX-II
    flickr

Posting Permissions

  • You may not post new threads
  • You may not post replies
  • You may not post attachments
  • You may not edit your posts
  •