


Disclaimer: The comments contained within this post are not directly affiliated with David Hobby or the Strobist blog--they are merely the thoughts of someone who has followed his instructions to great effect.
Sections:
1. Interested in Strobism?
2. If my flash isn't on my camera, what is it attached to?
3. Bare flash still looks a little harsh...How can I make it look better? [Light Modifiers]
So, this was a long in coming...
Seriously, I've been quite busy the last couple of months. Plus the task of completing this thread (and covering each modifier in detail) was quite intimidating. So instead of going into grueling detail like usual, I'm just going to give a quick rundown of the basic modifiers. That way, if you want to learn more, you'll know where to start your research.
Alrighty then. So your flash is off your camera. And you've somehow found a way to trigger it when you press the shutter button. Congratulations! Have you tested it out? Have you done some shots? My guess is that you probably have. And I'm also going to assume you've noticed something--the light (generally speaking) isn't very flattering. It creates very hard-edged shadows wherever the light doesn't reach. The problem is your flash is a small light source. Small light sources cause hard [lined] shadows. Large light sources produce a degree of gradient from highlight to shadow that is generally more pleasurable to the eyes.
So how do we turn the light coming from your tiny shoe-mount flash into something that strikes your subject with the flattery of a sincere compliment? Well, generally speaking, by making it larger. We do this by reflecting the light off of larger surfaces or else shooting through translucent ones (diffusing the light). Not every light modifier is designed to give you a large light source--but as your main lights are generally larger, let's start with them.
Umbrellas - Well, this is probably the most important tool for any strobist™ photographer--the venerable umbrella. It's relatively cheap, easy to use, and a perfect way to get started with off-camera flash use. There are only a few things you need to know about umbrellas, and I'll try to cover them quickly. White umbrellas are probably the most useful because you can use them in a reflective fashion or else as a shoot-through light modifier. Generally speaking, if used as a reflective umbrella, the light may be a little more diffused and will not be as powerful (as the surface is farther away from your subject). When used as a shoot-through umbrella, they can be placed much closer to the subject as you don't have to worry about the lightstand getting in the shot. Silver umbrellas are used as reflective umbrellas only. The light coming from a silver umbrella is generally cooler and a little more contrasty (I know, that's not even a word) than the light coming from a white umbrella. If you're doing a fashion-oriented shoot, then a silver umbrella might be a good option. There are umbrellas with other colored panels that have specific uses (like Gold panels that shed warm light on your subject). Personally, my favorite is the Westcott 43" White Collapsible umbrella (although I have 2 silver ones as well).
**DIY Tip: If you don't have an umbrella, you can create a fairly large light source simply by hanging a fairly thin bed sheet between your flash and your subject.**
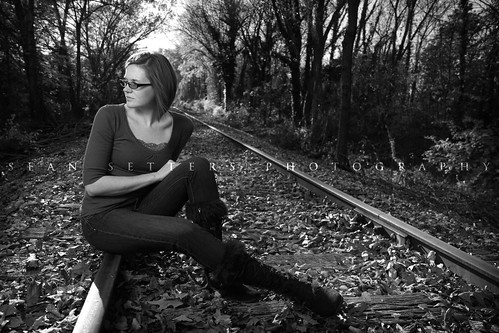
The shot below utilized flash shot through a white umbrella left of the subject (sun provided rim lighting).
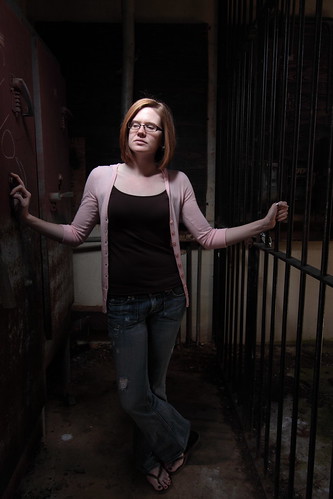
Softboxes - So what is a softbox? Well, a softbox is basically a large box with a translucent material on one side. You shoot the flash into the body of the softbox (or else directly at the translucent material) and the light is made larger by the diffusion material. It works very much like a shoot-through umbrella with one exception--there is minimal light spillage. When you use use a white umbrella, some light passes through the umbrella while the rest gets reflected back in the opposite direction. If you're trying to light specific areas of your subject while indoors, then that means you've got all sorts of light bouncing off the walls and contaminating the artsy lighting you're trying to create. Take this shot for example where a softbox was used:
Considering this was shot in a relatively small room, with a background that was very close to the subject, I don't think I could have achieved similar results without using a tool that controlled light spillage. In fact, the 28" Westcott Apollo I used in the picture above also has a protruding black rim along the edge of the diffusion material that helps control light spillage that much more. While I like the Westcott Apollo, I find it cumbersome and time consuming to set up and take down. It also didn't come with a carrying case, so I keep in in the plastic it was shipped in. On the other hand, my 15" Alzo Mini Softbox gets used quite a bit. The diffusion surface is smaller, yet it's much easier to travel with and is relatively fast to set up and take down (and it's also about half the price of the Westcott Apollo).
Keep in mind that softboxes come in a variety of shapes and sizes. Some have specialized names like strip lights (which are taller than they are wide). In the end, they all work the same way.
Beauty Dish - To be honest, I just got my first beauty dish last week. I haven't had very much time to really nail down what this thing can do, but I'm enjoying the initial results. I tried to come up with a good way to describe this light modifier, but I found Wiki's description fairly adequate.
"A beauty dish uses a parabolic reflector to distribute light towards a focal point. The light created is between that of a direct flash and a softbox, hence giving the image a wrapped, contrasted look, which adds a very dramatic effect!"
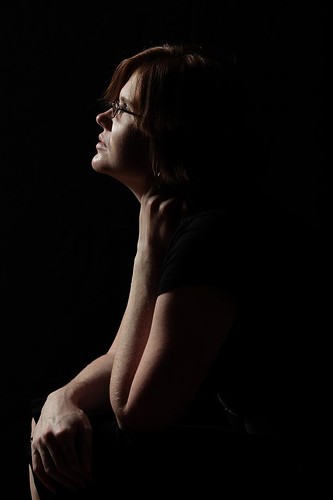
You can think of a beauty dish as a large spotlight. The light in the middle is quite intense, but the intensity falls off considerably the farther you move away from the center. A beauty dish allows you to focus a beam of light in a specific area of your frame. My best example is this:
Notice how there isn't any discernible light spillage in the photo. The light hitting the subject is intense and has a hard quality in the center, yet seems to soften up as the light radiates from the middle. I used a 14" Lumodi beauty dish suspended over the subject using a boom pole. Now the guys at Lumodi are basically a startup company and are currently hand making these things to order. It isn't necessarily cheap--however, it is cheap when you compare it to other beauty dishes available. I took a chance on it, and so far I'm loving how the light looks when I use it.
Ring Flash - Of all the light modifiers I mention, I have the least experience with this one. Let me rephrase that--I have no experience with ring flashes. A ring flash is a circular-shaped light modifier that is generally used on the lens axis. It it used quite often in the fashion industry as the ring flash basically kills all the shadows that may bring attention to the model's slightly imperfect complexion. The ring flash also produces a halo shadow around the subject. There are dedicated ring flashes as well as ring reflectors that turn your flash into a ring flash. Either way, the results are the same. David Hobby [the strobis himself] recently did a blog post comparing different ring flashes. If you're interested, check it out here.
Snoot - Wow, that's a funny word, isn't it? So what in the hell is a "snoot," you ask? Well, quite simply, it's a tool used to narrow your flash's beam of light. Remember earlier we were talking about light spillage? Well, a snoot attaches to the end of your flash and allows you to restrict its output to a small area and prevent a large amount of spillage. Snoots do not soften the light because they do not make it larger (in fact, they make it smaller). Snoots work well with hairlights because you can restrict the light to just the hair if you'd like. Honestly, I don't use a snoot very often. Honl Photo makes a snoot that you can attach to your flash, but I use a couple of sheets of craft foam glued together and a couple of strips of velcro to create a funnel that goes on the end of my flash. It's a cheap and easy solution for the few times I need it.
Grid - A grid attaches to the end of your flash and is usually made up of small circular tubes (almost like shooting your flash through a box of straws). A grid is much like a snoot in that it restricts the output of your flash. However, while a snoot produces a hard edge between highlight and shadow, a grid produces a gradient between them. It's kind of like a beauty dish, except an a much smaller scale. I find that when I want the restricted output of a snoot, I generally use a grid instead because I like the gradient it provides. Grids are a great DIY project as many people make their own (out of straws, no less, and other tubular substances). Personally, I like the grids in foam housing made by SaxonPC. They are custom fitted for your particular flash, and you can get several different sizes giving you different degrees of spread. I like the versatility of having the whole set. I used a grid above the subject in the following shot. Notice how perfectly circular the light is beneath her, while still providing a small amount of gradient from highlight to shadow.
Flag - Don't worry, I'm not going to ask you to recite the Pledge of Allegiance. A flag is a material you put between your flash and whatever you don't want the light emitted from your flashto hit (sometimes a flag is referred to as a "gobo"). It's a barrier, that's all. It's useful if you're wanting your flash to cover a large area, yet you don't want it to hit a particular spot. For my money, I keep a few 3x5" index cards and a roll of gaffer's tape in my lighting kit. There are pre-made solutions available, but I don't use flags enough to warrant spending more money on them. The index cards have worked when I needed them to.
Gels - Gels are a very important part of a strobist's lighting kit, yet they don't get as much attention as some of the higher-profile light modifiers found above. A gel is simply a colored piece of transparent material that you place on the end of your flash. When the light passes through it, it changes color. Gels are handy in allowing you to create special effects like in the grid photo above. However, they also allow a photographer to balance the light coming from his flash with the ambient light of the surroundings. This is a very important concept. Using an orange (CTO) gel when photographing indoors may allow you to balance your flash with any tungsten lights that may be providing fill or background illumination. In the end, if you don't like the color of the light in your photo, you can do a global white balance adjustment to find the color that works best. If you don't gel the flash, then your white balance adjustment will take much more time as you'll have to do individual adjustments on different areas of the photo. Take it from me--buy some gels and read the strobist's Lighting 101 section on gels. As for me, I'm a fan of Photogels.com. The 2x5 strips from Photogels fit well into the gel holder of my Vivitar 285HVs. If you have monolights and need larger gels, you can contact the Photogels guy and he can custom cut gels to order.
Reflector - A reflector reflects light (can't be much simpler than that!). Reflectors can be used to add fill light to areas of a photo where light currently isn't hitting. Think of it this way--a reflector is almost like having another flash. Reflectors come with many different surfaces--but white, silver, and gold tend to be the most prominent. There are thousands of strobists who use reflectors as a primary tool in their lighting kit. I don't. I find that they're too much trouble to set up and position (and reposition until you find just the angle of reflectivity you were looking for). I've got tons of flashes--I'll simply throw up another lightstand and umbrella to use as my fill. That said, they can be very useful tools if you become proficient with them. Ok, now for the recommendation: try white foam core first as that may be all you need. Else, try wrapping some tin foil over some cardboard. If you find you need a more permanent solution, there are dozens upon dozens of reflectors for purchase. Of all the reflectors I've seen (and yes, I do own a large one that rarely gets used), California Sunbounce's Sun-Mover is probably the most interesting. The problem with most reflectors is that they expand like a windshield reflector, yet don't stay taut. Once a reflector looks like a potato chip, it doesn't work as you'd expect it. The Sun-Mover has high strength tension rods that keep the reflective surface flat.
One thing about reflectors is that they can be used without off-camera flash. By reflecting sunlight, you can certainly light your subject. There is a problem with using a reflector this way--the subject can be blinded. Actually, I don't really care if the subject is blinded--however, I really don't like it when my subject is squinting.
So there you have it. I'm sure I overlooked something, but for now, that'll have to do. I'll update it if I find something important that I've omitted.


 Reply With Quote
 ></o
></o