-
Senior Member

Re: Lunar Eclipse Tonight
@HDNitehawk
Based on my shots of a full moon (at 300mm + 1.4x on a 1.3x crop camera), I would try the 7D with the 500 + 1.4x on a sturdy tripod. Your 5D II will be too wide without the 2x extender.
Shoot wide open at f/5.6. You don't need depth of field for the moon, but you do need all the light you can get to avoid the nasty ISO noise that you'll suffer if you close the aperture too much, especially since the moon may not be its usual bright white, and only partly visible. Use ISO 100 if you can, but it's hard to advise how much light there will be since I've never seen this event. Use spot metering and exposure bracketing. Keep checking the histogram and compensate as required.
@mpphoto12
Same general advice, but you'll have to crop really tight to get anything, unless you get lucky with some dramatic clouds in a (relatively) wide shot at 200mm. ISO 50 is a possibility, since you could be shooting at f/2.8
I hope the sky stays clear for you and look forward to seeing any shots you get. I'm unlikely to see it through the fog here in Britain, and we only get to see a partial eclipe just before sunrise anyway. Looks like were all counting on you two tonight. No pressure.
Last edited by Andy Stringer; 11-11-2011 at 11:25 AM.
-
Re: Lunar Eclipse Tonight
haha thanks a ton Andy, weather shows completely clear here in NJ and i hope i can crop something to a decent shot! thanks and ill be sure to post whatever is salvageable haha im not as fortunate to own a 500 f4 haha
-
Re: Lunar Eclipse Tonight
also would it be smarter to use my rebel XT for the crop factor of 1.6? to get closer or save better image quality with my 1.3X MK III and crop?
-
Senior Member
Re: Lunar Eclipse Tonight
My earliest shots of the moon were taken with the 350D / Rebel XT and the 70-200mm f/2.8L IS, and I was happy with them at the time, so you will get something with that combination.
The extra crop factor and higher pixel density of the XT will give you more resolution for the same image. I haven't studied the difference in noise, but you still have time to check Bryan's reviews. On the other hand, you might feel more comfortable nailing focus with the 1D's micro-adjustment or Live View, which your older body lacks.
It's bedtime here, so I'll sign off for tonight and check back tomorrow. Good luck.
-
Re: Lunar Eclipse Tonight
I borrowed this from--->Copyright Notice
All photographs, text and web pages are © Copyright 2007 by Fred Espenak, unless otherwise noted. All rights reserved. They may not be reproduced, published, copied or transmitted in any form, including electronically on the Internet or WWW, without written permission of the author. The photos have been digitally watermarked.
MrEclipse.com Banner
Quick Index
Solar Eclipses | Lunar Eclipses | Night Sky | Alert! | Photos | Travel | Potpourri | Links | Store | Picks | Search
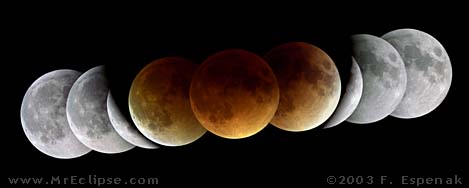
1982 Total Lunar Eclipse
1982 Total Lunar Eclipse
The partial phases and totality during a 1982 lunar eclipse.
(click to see more 1982 photos)
How to Photograph a Lunar Eclipse
©2008 by Fred Espenak. All rights reserved.
Introduction
Photographing an eclipse of the Moon is fun and easy. You don't even have to worry about special filters to protect your eyes or your camera. Unlike eclipses of the Sun, eclipses of the Moon are perfectly safe to watch with the naked eye.
A lunar eclipse occurs whenever the Moon passes through Earth's dark shadow. This can only happen during Full Moon. Although there is a Full Moon every 29 1/2 days, there are only 2 or 3 lunar eclipses a year. That's because the Moon's orbit is tipped 5 degrees to Earth's so the Moon misses Earth's shadow at most Full Moons. (see: Lunar Eclipses For Beginners)
Watching and photographing an eclipse of the Moon is a relaxing activity since it progresses at a leisurely pace. The eclipse begins as a small notch slowly appears along one edge of the Moon. During the next hour, the Moon gradually dips deeper into Earth's dark umbral shadow. If the eclipse is a total one, the last remaining minutes of the partial phases can be quite dramatic and beautiful. The crescent of the Moon grows thinner as darkness propagates through a night sky now deprived of moonlight. If you're away from city lights, the Milky Way becomes bright and beautiful as the total phase begins. It's quite a remarkable sight.
Cameras
It wasn't very long ago that film was king while digital cameras were low resolution, high-priced gizmos. Today, digital cameras are as common as film cameras if not more so. And 6 to 12 megapixel digital cameras offer image quality to rival or even surpass film.
Lunar eclipses can be captured easily with both film and digital cameras. The simpler point and shoot cameras have a non-interchangable lens with a single focal length. Better models are equipt with a 3x or larger zoom lens. The most versatile (and expensive) cameras are the 35mm SLR (single lens reflex) and its digital counterpart the DSLR (digital single lens reflex) . These cameras allow you to replace the kit lens with any number of other lenses from wide angle to super telephoto. You can even connect an SLR or DSLR directly to a telescope so that the Moon fills the entire frame. No matter what kind of camera you own, one or more of the following techniques can be used be used to shoot a lunar eclipse.
1982 Lunar Eclipse
1982 Total Lunar Eclipse in Geminii
The very dark total lunar eclipse of 1982 Dec 30
was captured with a simple 35mm camera on a tripod.
(50mm Nikkor lens, 30 seconds at f/1.8 on Ektachrome 400)
(click to see larger image)
Wide Angle
The simplest way to photograph an eclipse is to use the Wide Angle technique. Any kind of camera can be used as long as it's capable of shooting long exposures of 5 seconds or more in duration. If the camera accepts a cable release, this will help eliminate any vibrations that can blur your photo. Alternatively, you could use the camera's self timer to minimize vibrations. Check the camera's user manual to see if it has some kind of long exposure or night mode. You also need to turn off the electronic flash. Once again, check the manual if necessary.
With long exposures, it's best to attach the camera to a solid tripod. In a pinch, you can prop the camera up on a wall, fence post or rock. Just make sure it's secure and won't fall to the ground. For 35mm SLRs, a wide angle lens (28mm or 35mm) is recommended but a normal 50mm lens also works fine. For DSLRs, use a focal length in the range of 18mm to 35mm. With point and shoot cameras, try setting the zoom at wide angle (shortest focal length).
A speed film or ISO setting of 400 is a good choice. If your camera has a manual exposure mode, set the lens to its widest aperture (smallest numeric f/number) and use a range of exposures from 5 seconds to 40 seconds (i.e, 5, 10, 20 and 40 seconds). Exposures longer than this will start to trail or streak because of Earth's rotation on its axis. A major advatage of digital cameras is that you can check your exposures to see which shutter speeds work best.
The Moon appears quite small in a wide angle photo, so the idea behind this kind of picture is to capture the eclipse with an interesting foreground. It could be a building (e.g. - church steeple), tower, tree or even the horizon. This gives the photo some context by showing the eclipsed Moon in a familiar environment.
You can estimate the eclipsed Moon's direction and elevation by checking the Moon's position one or two nights before the eclipse. Just keep in mind that the Moon will appear in the same location about 50 minutes later each night. This is just a rough guide but it should be good enough for planning purposes. Let's say it's two nights before the eclipse and you want to estimate where the eclipsed Moon will be in order to photograph it with some foreground object. If the eclipse begins at 11 PM, the Moon would be in approximately the same part of the sky at 9:20 PM two nights before the eclipse. This kind of exercise is a great help in planning a successful eclipse photo.
2000 Eclipse Trail
2000 Total Lunar Eclipse
The star trail technique was used to take this photo during the total lunar eclipse of 2000 Jan 21.
The lens aperture was opened to f/5.6 during totality.
The narrow lines which parallel the Moon's path are images of bright stars.
(50mm Nikkor lens, f/16 opened to f/5.6 during totality,
total exposure time was 2 hours and 30 minutes on Kodak Royal Gold 400)
(click to see larger image)
Star Trail
A variation on the Wide Angle technique is to use very long exposures of an hour or more. This allows the Moon to slowly drift across the camera field of view as the Earth rotates. The Star Trail technigue can be done with the same kind of camera and lens used for Wide Angle photos (described in the previous section).
In this case, a tripod and a cable release are a must, and your camera also needs to have a manual bulb setting so that you can lock the shutter open. Choose a moderate ISO speed (ISO 200 or 400), and an aperture of f/8 or f/11. As the eclipse begins, place the Moon's image in one corner of your camera's viewfinder. Your camera should be oriented so that the Moon's image will move across the camera's field during a 1 to 3 hour exposure. This motion is actually caused by Earth's rotation on its axis. You can figure out the approximate orientation by trying it out on the Moon one or two nights before the eclipse. Just remember that the Moon rises about 50 minutes later each night. For example, if the eclipse begins at 10 PM, you'll need to run the test at 9:10 PM one night before the eclipse (or at 8:20 PM two nights before).
To record all the partial and total phases of a lunar eclipse in one frame, you need to know the field of view of your camera lens as well as the the duration of the eclipse. The Moon appears to move across the sky at a rate of 15° per hour--its own diameter every two minutes. A 50mm lens (35mm for DSLRs) has a field of 49° along the diagonal. It should take the Moon about three hours to traverse the diagonal, so try to orient your camera so that the Moon moves in this direction. See the Field of View Table below for a number of different lens focal lengths.
Lunar Eclipse Field of View
(click to see larger version)
Choose one corner of your viewfinder, place the Moon there and see if it drifts into or out of the frame after several minutes. Select a different corner if the Moon moves the wrong way. If your tripod allows you to tilt your camera, you can use this capability to frame the Moon so that it will pass through the diagonal of your camera's viewfinder.
A couple of final tips should help. If the eclipse occurs in the early evening, the Moon will be rising and its motion brings it up and to the right as you face the Moon. If the eclipse occurs during the middle of the night, the Moon's motion is basically from left to right. If the eclipse occurs during the early morning hours, the Moon is setting and its motion takes it down and to the right. If you're in the Southern Hemisphere, change right to left in the previous 3 sentences.
On eclipse night, load your camera with film (or a fresh memory card), mount it firmly on a tripod and make one last check of your f/number, focus (on infinity) and shutter speed. At the appointed time, lock open the shutter with your cable release, sit back and enjoy the eclipse! You can close the shutter in one or two hours, depending on your lens and the time required for the Moon to pass through the camera's field. When your film is developed, you'll have an picture of the sky with the Moon's image smeared across it. The interesting thing is that the diameter of the Moon's trail will be a function of the Moon's brightness (i.e., phase of the eclipse). If your exposure includes part of totality, the Moon's trail will probably dwindle down to a bright orange or dark red line.
Note for digital camera users: make sure your camera battery has enough power to last for a several hour long exposure. If you have an AC power adapter for your camera, that might be a better choice than battery power. You should also turn your camera's noise reduction feature on. This greatly improves the image quality for long exposures (check the camera manual).
Total Eclipse Over Maui
2000 Total Eclipse Over Maui
The Multiple Exposure technique was used during the total lunar eclipse of 2000 July 16 from Maui.
A Nikon 8008 in multiple exposure mode was used to capture the entire eclipse on one frame of film.
The basic exposure of 1/125 second at f/5.6 was increased to 1/8 second within 15 minutes of totality
and then set to 4 seconds throughout totality.
A second exposure (metered) captures morning twilight and silhouetted palm trees.
Nikon 8008, Nikkor 35mm f/5.6
Kodak Royal Gold 100: 1/125 to 1/8 on (partial phases), 4 seconds (totality)
(click to see report and more photos)
Multiple Exposure
The Wide Angle technique captures one instant during an eclipse. The Star Trail technique records several hours of an eclipse but the resulting image is rather abstract and doesn't resemble the naked-eye apperance on an eclipse. The Multiple Exposure technique combines the best of the Wide Angle and Star Trail techniques by capturing a sequence of individual images that show the eclipse through a large number of stages. Although the technique can be used by both film and digital cameras, the exact details are very different for these two camera technologies.
Multiple Exposure with Film -
The goal here is to capture a series of separate exposures on one frame of film. To accomplish this, your camera must be capable of shooting double or multiple exposures. Check the camera manual to learn if your camera has a multiple exposure feature and how to use it.
Multiple Exposure with Digital -
With digital cameras, a series of exposures are shot during the eclipse and saved as separate image files. These are later stacked and combined into one image using a photo editing program like Photoshop.
The camera set up and orientation for both film and digital cameras is identical to the Star Trail method. The difference here is that you will take a series of short exposures at various stages of the eclipse instead of one long exposure (film cameras must be in multiple exposure mode). The resulting exposures will reveal a series of small Moon images each illustrating a different phase of the eclipse. An essential key to the success of this method is ensuring that your camera and tripod remain absolutely rigid and do not move throughout the eclipse.
Make the first exposure as the partial eclipse begins and then shoot additional exposures every five to ten minutes. Be consistent and use the same time interval between every shot. This will produce an aesthetically pleasing string of evenly spaced Moon images showing the progress of the eclipse. A digital wristwatch with a count-down timer is a great help to keep you on track for each exposure.
Since the Moon's brightness varies during the eclipse, you also need to change the exposures as the eclipse proceeds. The Lunar Eclipse Exposure Guide below gives approximate camera settings for various stages of the eclipse. To use the guide, begin in the upper left corner by selecting your ISO speed. On the same line, move to the right until you reach your chosen aperture (f/number). Then move straight down to the phase of the eclipse and read the recommended shutter speed. For the partial phases the magnitude isn just the fraction of the Moon's disk immersed in the Earth's umbral shadow. As the partial phases progress, just estimate the eclipse magnitude to determine the recommended exposure. For example, let's say you're using ISO 400 at f/8. The table recommends a shutter speed of 1/1000 as the partial eclipse begins. The shutter speeds for eclipse magnitudes 0.3, 0.6, 0.8 and 0.9 would then be 1/500, 1/250, 1/125 and 1/60, respectively.
Lunar Eclipse Exposure Table
(click to see larger version of table)
Note that the Exposure Guide lists a range of different exposures for totality. For the time being, use the row labeled "Totality: L=3" to determine your exposure. These values will be explained in the section Brightness of Total Lunar Eclipses. Continue taking exposures using the time interval you've chosen until the Moon moves outside your camera's field of view.
For film cameras, it's important to now take your camera out of multiple exposure mode. Otherwise, your carefully executed eclipse picture will be superimposed on the next picture you take. To be safe, put the lens cap on the camera and shoot two or three frames to verify that the film is advancing through the camera. When the film is developed, you'll have one frame that compresses the entire eclipse into one picture with a sequence of tiny Moon's each reflecting a different phase of the eclipse.
For digital cameras, download all the images to your computer. Use an image editing program like Photoshop or Photoshop Elements to add all the individual image files as separate layers in one new composite file. Finally, flatten the layers to combine the separate exposures into one.
2000 Total Eclipse
Portrait of Totality
The total lunar eclipse of 2000 Jan 20-21 was photographed from Dunkirk, Maryland.
An AstroPhysics 120 EDT Refractor (5" F/6) and AP 2X Barlow produced a focal length of 1500mm.
The image was made on Kodak Royal Gold 100 with a Nikon N70 camera (4 seconds at f/12).
(click to see more photos)
Telephoto Photography
To achieve large images of the Moon, you need to use a long telephoto lens or a telescope. Point & Shoot cameras can be used if they have a powerful zoom lens (6x or more). In this case, the longer the zoom's focal length, the better. Try shooting some photos of the Moon a few days before the eclipse to see how big the Moon's image will be using the maximum zoom setting. Just don't expect Point & Shoot cameras to deliver a Moon image that fills the frame. For that, you need either an SLR or DSLR.
The big advantage of SLR (film) and DSLR (digital) cameras is that they take interchangeable lenses. In this case, a lens with a long focal length is needed to get as large an image as possible.
With SLRs (film), a 50mm lens produces an image of the Moon only 0.5mm across. Switching to a 200mm telephoto or zoom lens, the Moon appears 1.8mm in diameter. This is still quite small but at least the image is recognizable. However, there are a number of compact 500mm mirror lenses available in the $100 to $250 price range which yield a lunar image 4.6mm in diameter. While this is seems like a respectable size, it still doesn't fill the frame. Adding a 2x tele-extender to a 500 mm lens results in a focal length of 1000mm which doubles the Moon's size to 9.2mm.
Most recommendations for SLRs apply to DSLRs as well. The primary difference is that the imaging chip in most DSLR cameras is only about 2/3 the area of a 35mm film frame (see your DSLR's technical specifications). This means that the relative size of the Moon’s image appears 1.5 times larger in a DSLR so a shorter focal length lens can be used to achieve the same angular coverage compared to a SLR. For example, a 500mm lens on a DSLR produces the same relative image size as a 750mm lens on a SLR.
The diagram below shows the apparent size of the Moon at six different focal lengths. The focal lengths for SLRs are black while DSLR values are in blue.
Lunar Eclipse Image Scale
(click to see larger version)
Focal lengths in excess of 1000mm take you into the realm of the super telephoto lens. If you're in the market for such an item, you might consider a small telescope instead. The main advantage of a telescope is that you can also use it visually with variable power eyepieces. There are a number of brands and models in the 1000mm to 2000mm focal length range, including the Celestron 90 and the Meade ETX. These instruments are both compact catadioptics in the $300 to $500 price range. The 3 1/2" Questar is renowned for both its high optical quality and price ($3000 to $4000).
These telescopes are available with equatorial fork mounts and electric clock drives which counteract the Earth's rotation and allow you to automatically track the Sun, Moon and stars. A wealth of information on commercial telescopes can be obtained from advertisers in magazines like Astronomy or Sky and Telescope. Keep in mind that a focal length of 2500mm (1700mm for DSLRs) produces an image of the Moon that barely fits the narrow dimension of the camera field of view.
The Moon's image size on 35mm film can be calculated for any lens by dividing its focal length by 109. The Field of View & Image Size Table lists the size of the Moon's image over a wide range of lens focal lengths. The table also gives the field of view of each lens for both SLRs and DSLRs. This is useful for planning phtotgraphy using the Star Trail and Multiple Exposure techniques.
With a telephoto lens or telescope, you can capture various stages of the eclipse using the Lunar Eclipse Exposure Guide as a starting point for your exposures. Bracket your exposures by making one exposure at the recommended value and then two more at one stop (or shutter speed) overexposed and one stop underexposed. In most cases, this will ensure that you obtain a well exposed image. To be extra safe, you might even bracket plus or minus two stops. Weather conditions (fog, haze, thin clouds) may require an additional two or three stops to achieve a good exposure. Just remember that film and memory chips are cheap and eclipses don't happen every month!
To capture a good sequence of photos, you'll probably want to take a bracketed series of exposures every ten or fifteen minutes. Just make sure that you use a large enough tripod to hold you telephoto lens firmly with as little vibration as possible. The major challenge to lunar eclipse photography comes during totality because there's no way to predict how bright the Moon will appear.
2004 Total Eclipse
Triple Play Totality
The total lunar eclipse of 2004 Oct 28 was widely visible from the USA.
This trio of images captures the Moon at the beginning (right), middle (center) and end (left) of totality.
The composite was assembled from three separate exposures using Adobe Photoshop.
An AstroPhysics 105 EDT Refractor (4" F/6) and AP 2X Barlow produced a focal length of 1200mm.
The image was made with a Nikon D100 DSLR camera (4 seconds at f/12).
(click to see more photos)
Brightness of Total Lunar Eclipses
During a total eclipse, the Moon's color and brightness can vary enormously. It can take on hues from bright orange, through deep red, dark brown or even dark grey as it's brilliance ranges from bright to dark to nearly invisible. Although the Moon is cut off from all direct sunlight while it is in Earth's umbral shadow, the Moon receives indirect sunlight which is refracted through and modified by Earth's atmosphere. Our atmosphere contains varying amounts of water (clouds, mist, precipitation) and solid particles (dust, organic debris, volcanic ash).
This material filters and attenuates the sunlight before it's refracted into the Earth's shadow. For instance, large or frequent volcanic eruptions dumping huge quantities of ash into the atmosphere are often followed by very dark, brownish red eclipses for several years. Extensive cloud cover along Earth's limb also tends to darken the eclipse by blocking sunlight.
To successfully photograph the total phase of an eclipse, you have to be able make a reasonable guess as to how bright a particular eclipse is. Fortunately, a French astronomer named Dajon formulated a simple five point scale for evaluating the visual appearance and brightness of the Moon during total lunar eclipses. 'L' values for various luminosities are defined as follows:
L = 0 Very dark eclipse.
Moon almost invisible, especially at mid-totality.
L = 1 Dark Eclipse, gray or brownish in coloration.
Details distinguishable only with difficulty.
L = 2 Deep red or rust-colored eclipse.
Very dark central shadow, while outer edge of umbra
is relatively bright.
L = 3 Brick-red eclipse.
Umbral shadow usually has a bright or yellow rim.
L = 4 Very bright copper-red or orange eclipse.
Umbral shadow has a bluish, very bright rim.
The assignment of an 'L' value to lunar eclipses is best done with the naked eye, binoculars or a small telescope during totality. Use the descriptions above and select the one that best fits the Moon's appearance.
To photograph the Moon in total eclipse, you choose the exposure with the corresponding 'L' value from the Lunar Eclipse Exposure Guide. Keep in mind that this exposure is only a estimate. You should bracket two or three stops over and under the recommendation. Better yet, if your camera has a spot meter, use it to take an actual exposure reading and bracket from that point. If you have a digital camera, check your exposures and modify them as needed.
The Lunar Eclipse Photo Links offer many more examples of lunar eclipse phototgraphs.
Future Lunar Eclipses
To plan your eclipse photography, you'll need to know when upcoming lunar eclipses will occur and the contact times of the partial and total phases. This information is available at Lunar Eclipse Preview: 2001-2020.
The last total lunar eclipse visible from the U.S.A. occured on Aug. 28, 2007. The next total lunar eclipse occurs on Feb. 21, 2008.
Upcoming lunar eclipses visible from the U.S.A. include Feb. 21, 2008 (total), Jun. 26, 2010 (partial), Dec. 21, 2010 (total), Jun. 04, 2012 (partial), Apr. 15, 2014 (total) and Oct. 08, 2014 (total).
2000 Total Eclipse
Phases of the 2000 Total Lunar Eclipse
This photo is centered on Earth's umbral shadow and shows
various stages of the total lunar eclipse of 2000 Jan 20-21.
The composite was made in Adobe Photoshop from nine separate photos
shot on Kodak Royal Gold 100 with a Nikon N70 camera
AstroPhysics 120 EDT Refractor (5" F/6) and AP 2X Barlow (focal length of 1500mm)
(click to see more photos)
Eclipse References
* Astrophotography Basics, Kodak Customer Service Pamphlet P150, Eastman Kodak, Rochester, 1988.
* Harrington, P., Eclipse! The What, Where, When, Why, and How Guide to Watching Solar & Lunar Eclipses, John Wiley & Sons, 1997.
* Pasachoff, J. M., and Covington, M., Cambridge Guide to Eclipse Photography, Cambridge University Press, Cambridge and New York, 1993.
* Reynolds, M. D. and Sweetsir, R. A., Observe Eclipses, Astronomical League, Washington, DC, 1995.
* Sherrod, P. C., A Complete Manual of Amateur Astronomy, Prentice-Hall, 1981.
Lunar Eclipse Predictions
* Lunar Eclipse Preview: 2001-2020
* Eclipses During 2008 Observer's Handbook 2008
* Five Millennium Catalog of Lunar Eclipses: 2000 BCE to AD 3000 CE
* Lunar Eclipses of Historical Interest
Lunar Eclipse Photographs
* Lunar Eclipse Photo Gallery 1
* Lunar Eclipse Photo Gallery 2
* Total Lunar Eclipse of 1982 Jul 06
* Total Lunar Eclipse of 2000 Jan 20-21
* Total Lunar Eclipse of 2000 Jul 16
* Total Lunar Eclipse of 2004 Oct 27-28
Other Links
* Lunar Eclipses For Beginners
* Solar Eclipses For Beginners
* How to Photograph a Solar Eclipse
* Index to Eclipse and Astronomy Photographs
* MrEcipse's Picks - recommendations on cameras, tripods, telescopes, and more
Copyright Notice
All photographs, text and web pages are © Copyright 2007 by Fred Espenak, unless otherwise noted. All rights reserved. They may not be reproduced, published, copied or transmitted in any form, including electronically on the Internet or WWW, without written permission of the author. The photos have been digitally watermarked.
The photographs may be licensed for commercial, editorial, and educational use. Contact Espenak (at MrEclipse) for photo use in print, web, video, CD and all other media.
Return to: MrEclipse Main Page
WebMaster: MrEclipse
Last revised: 2008 Feb 26
-
Re: Lunar Eclipse Tonight
Copyright Notice
All photographs, text and web pages are © Copyright 2007 by Fred Espenak, unless otherwise noted. All rights reserved. They may not be reproduced, published, copied or transmitted in any form, including electronically on the Internet or WWW, without written permission of the author. The photos have been digitally watermarked.
<div class="MEindex1"]

Quick Index

1982 Total Lunar Eclipse
The partial phases and totality during a 1982 lunar eclipse.
(click to see more 1982 photos)
<h1 class="ctrBlue"] How to Photograph a Lunar Eclipse </h1>
<h5 class="ctr"] ©2008 by Fred Espenak. All rights reserved. </h5>
<a name="Intro"]
<h3>Introduction</h3>
<p class="MEindent"]
Photographing an eclipse of the Moon is fun and easy.
You don't even have to worry about special filters to protect your eyes or your camera.
Unlike eclipses of the Sun, eclipses of the Moon are perfectly safe to watch with the naked eye.
<p class="MEindent"]
A lunar eclipse occurs whenever the Moon passes through Earth's dark shadow.
This can only happen during Full Moon.
Although there is a Full Moon every 29 1/2 days, there are only 2 or 3 lunar eclipses a year.
That's because the Moon's orbit is tipped 5 degrees to Earth's so the Moon misses Earth's shadow at most Full Moons.
(see:
Watching and photographing an eclipse of the Moon is a relaxing activity since it progresses at a leisurely pace.
The eclipse begins as a small notch slowly appears along one edge of the Moon.
During the next hour, the Moon gradually dips deeper into Earth's dark umbral shadow.
If the eclipse is a total one, the last remaining minutes of the partial phases can be quite dramatic and beautiful.
The crescent of the Moon grows thinner as darkness propagates through a night sky now deprived of moonlight.
If you're away from city lights, the Milky Way becomes bright and beautiful as the total phase begins.
It's quite a remarkable sight.
<a name="Cameras"]
<h3>Cameras</h3>
<p class="MEindent"]
It wasn't very long ago that film was king while digital cameras were
low resolution, high-priced gizmos. Today, digital cameras are as common
as film cameras if not more so. And 6 to 12 megapixel digital cameras
offer image quality to rival or even surpass film.
<p class="MEindent"]
Lunar eclipses can be captured easily with both film and digital cameras.
The simpler point and shoot cameras have a non-interchangable
lens with a single focal length.
Better models are equipt with a 3x or larger zoom lens.
The most versatile (and expensive) cameras are the 35mm SLR (single lens
reflex) and its digital counterpart the DSLR (digital single lens
reflex) .
These cameras allow you to replace the kit lens with any number of other
lenses from wide angle to super telephoto.
You can even connect an SLR or DSLR directly to a telescope so that the
Moon fills the entire frame.
No matter what kind of camera you own, one or more of the following
techniques can be used be used to shoot a lunar eclipse.
<a name="Wide"][/URL]
<p class="MEcenter"]

1982 Total Lunar Eclipse in Geminii
The very dark total lunar eclipse of 1982 Dec 30
was captured with a simple 35mm camera on a tripod.
(50mm Nikkor lens, 30 seconds at f/1.8 on Ektachrome 400)
(click to see larger image)
<h3>Wide Angle</h3>
<p class="MEindent"]
The simplest way to photograph an eclipse is to use the Wide Angle technique.
Any kind of camera can be used as long as it's capable of shooting long exposures of 5 seconds or more in duration.
If the camera accepts a cable release, this will help eliminate any vibrations that can blur your photo.
Alternatively, you could use the camera's self timer to minimize vibrations.
Check the camera's user manual to see if it has some kind of long exposure or night mode.
You also need to turn off the electronic flash.
Once again, check the manual if necessary.
<p class="MEindent"]
With long exposures, it's best to attach the camera to a solid tripod.
In a pinch, you can prop the camera up on a wall, fence post or rock.
Just make sure it's secure and won't fall to the ground.
For 35mm SLRs, a wide angle lens (28mm or 35mm) is recommended but a normal 50mm lens also works fine.
For DSLRs, use a focal length in the range of 18mm to 35mm.
With point and shoot cameras, try setting the zoom at wide angle (shortest focal length).
<p class="MEindent"]
A speed film or ISO setting of 400 is a good choice.
If your camera has a manual exposure mode, set the lens to its widest
aperture (smallest numeric f/number) and use a range of exposures from 5
seconds to 40 seconds (i.e, 5, 10, 20 and 40 seconds).
Exposures longer than this will start to trail or streak because of
Earth's rotation on its axis.
A major advatage of digital cameras is that you can check your exposures
to see which shutter speeds work best.
<p class="MEindent"]
The Moon appears quite small in a wide angle photo, so the idea behind
this kind of picture is to capture the eclipse with an interesting
foreground.
It could be a building (e.g. - church steeple), tower, tree or even the
horizon.
This gives the photo some context by showing the eclipsed Moon in a
familiar environment.
<p class="MEindent"]
You can estimate the eclipsed Moon's direction and elevation by checking
the Moon's position one or two nights before the eclipse.
Just keep in mind that the Moon will appear in the same location about
50 minutes later each night.
This is just a rough guide but it should be good enough for planning
purposes.
Let's say it's two nights before the eclipse and you want to estimate
where the eclipsed Moon will be in order to photograph it with some
foreground object.
If the eclipse begins at 11 PM, the Moon would be in approximately the
same part of the sky at 9:20 PM two nights before the eclipse.
This kind of exercise is a great help in planning a successful eclipse
photo.
<a name="StarTrail"][/URL]
<p class="MEcenter"]

2000 Total Lunar Eclipse
The star trail technique was used to take this photo during the total lunar eclipse of 2000 Jan 21.
The lens aperture was opened to f/5.6 during totality.
The narrow lines which parallel the Moon's path are images of bright stars.
(50mm Nikkor lens, f/16 opened to f/5.6 during totality,
total exposure time was 2 hours and 30 minutes on Kodak Royal Gold 400)
(click to see larger image)
<h3>Star Trail</h3>
<p class="MEindent"]
A variation on the Wide Angle technique is to use very long exposures of an hour or more.
This allows the Moon to slowly drift across the camera field of view as the Earth rotates.
The Star Trail technigue can be done with the same kind of camera and lens used for Wide Angle photos (described in the previous section).
<p class="MEindent"]
In this case, a tripod and a cable release are a must, and your camera
also needs to have a manual bulb setting so that you can lock the
shutter open.
Choose a moderate ISO speed (ISO 200 or 400), and an aperture of f/8 or
f/11.
As the eclipse begins, place the Moon's image in one corner of your
camera's viewfinder.
Your camera should be oriented so that the Moon's image will move across
the camera's field during a 1 to 3 hour exposure.
This motion is actually caused by Earth's rotation on its axis.
You can figure out the approximate orientation by trying it out on the
Moon one or two nights before the eclipse.
Just remember that the Moon rises about 50 minutes later each night.
For example, if the eclipse begins at 10 PM, you'll need to run the test
at 9:10 PM one night before the eclipse (or at 8:20 PM two nights
before).
<p class="MEindent"]
To record all the partial and total phases of a lunar eclipse in one
frame, you need to know the field of view of your camera lens as well as
the the duration of the eclipse.
The Moon appears to move across the sky at a rate of 15° per hour--its
own diameter every two minutes.
A 50mm lens (35mm for DSLRs) has a field of 49° along the diagonal.
It should take the Moon about three hours to traverse the diagonal, so
try to orient your camera so that the Moon moves in this direction.
See the Field of View Table below for a number of different lens focal lengths.
<div class="MEbox1"]
<p class="MEcenter"]

(click to see larger version)
</div>
<p class="MEindent"]
Choose one corner of your viewfinder, place the Moon there and see if it
drifts into or out of the frame after several minutes.
Select a different corner if the Moon moves the wrong way.
If your tripod allows you to tilt your camera, you can use this
capability to frame the Moon so that it will pass through the diagonal
of your camera's viewfinder.
<p class="MEindent"]
A couple of final tips should help.
If the eclipse occurs in the early evening, the Moon will be rising and
its motion brings it up and to the right as you face the Moon.
If the eclipse occurs during the middle of the night, the Moon's motion
is basically from left to right.
If the eclipse occurs during the early morning hours, the Moon is
setting and its motion takes it down and to the right. If you're in the
Southern Hemisphere, change right to left in the previous 3 sentences.
<p class="MEindent"]
On eclipse night, load your camera with film (or a fresh memory card),
mount it firmly on a tripod and make one last check of your f/number,
focus (on infinity) and shutter speed.
At the appointed time, lock open the shutter with your cable release,
sit back and enjoy the eclipse!
You can close the shutter in one or two hours, depending on your lens
and the time required for the Moon to pass through the camera's field.
When your film is developed, you'll have an picture of the sky with the
Moon's image smeared across it.
The interesting thing is that the diameter of the Moon's trail will be a
function of the Moon's brightness (i.e., phase of the eclipse).
If your exposure includes part of totality, the Moon's trail will
probably dwindle down to a bright orange or dark red line.
<p class="MEindent"]
Note for digital camera users: make sure your camera battery has enough
power to last for a several hour long exposure.
If you have an AC power adapter for your camera, that might be a better
choice than battery power. You should also turn your camera's noise reduction feature on.
This greatly improves the image quality for long exposures (check the camera manual).
<a name="MultipleExposure"][/URL]
<p class="MEcenter"]

2000 Total Eclipse Over Maui
The Multiple Exposure technique was used during the total lunar eclipse of 2000 July 16 from Maui.
A Nikon 8008 in multiple exposure mode was used to capture the entire eclipse on one frame of film.
The basic exposure of 1/125 second at f/5.6 was increased to 1/8 second within 15 minutes of totality
and then set to 4 seconds throughout totality.
A second exposure (metered) captures morning twilight and silhouetted palm trees.
Nikon 8008, Nikkor 35mm f/5.6
Kodak Royal Gold 100: 1/125 to 1/8 on (partial phases), 4 seconds (totality)
(click to see report and more photos)
<h3>Multiple Exposure</h3>
<p class="MEindent"]
The Wide Angle technique captures one instant during an eclipse.
The Star Trail technique records several hours of an eclipse
but the resulting image is rather abstract and doesn't resemble the
naked-eye apperance on an eclipse.
The Multiple Exposure technique combines the best of the Wide Angle and Star Trail
techniques by capturing a sequence of individual images that show the
eclipse through a large number of stages.
Although the technique can be used by both film and digital cameras, the
exact details are very different for these two camera technologies.
<p class="MEindent"]
Multiple Exposure with Film -
- The goal here is to capture a series of separate exposures on one frame of film.
To accomplish this, your camera must be capable of shooting double or multiple exposures.
Check the camera manual to learn if your camera has a multiple exposure feature and how to use it.
<p class="MEindent"]
Multiple Exposure with Digital -
- With digital cameras, a series of exposures are shot during the eclipse and saved as separate image files.
These are later stacked and combined into one image using a photo editing program like Photoshop.
<p class="MEindent"]
The camera set up and orientation for both film and digital cameras is identical to the Star Trail
method.
The difference here is that you will take a series of short exposures at
various stages of the eclipse instead of one long exposure (film
cameras must be in multiple exposure mode).
The resulting exposures will reveal a series of small Moon images each
illustrating a different phase of the eclipse.
An essential key to the success of this method is ensuring that your
camera and tripod remain absolutely rigid and do not move throughout the
eclipse.
<p class="MEindent"]
Make the first exposure as the partial eclipse begins and then shoot additional exposures every five to ten minutes.
Be consistent and use the same time interval between every shot.
This will produce an aesthetically pleasing string of evenly spaced Moon images showing the progress of the eclipse.
A digital wristwatch with a count-down timer is a great help to keep you on track for each exposure.
<p class="MEindent"]
Since the Moon's brightness varies during the eclipse, you also need to change the exposures as the eclipse proceeds.
The
Lunar Eclipse Exposure Guide
below gives approximate camera settings for various stages of the eclipse.
To use the guide, begin in the upper left corner by selecting your ISO speed.
On the same line, move to the right until you reach your chosen aperture (f/number).
Then move straight down to the phase of the eclipse and read the recommended shutter speed.
For the partial phases the magnitude isn just the fraction of the Moon's disk immersed in the Earth's umbral shadow.
As the partial phases progress, just estimate the eclipse magnitude to determine the recommended exposure.
For example, let's say you're using ISO 400 at f/8.
The table recommends a shutter speed of 1/1000 as the partial eclipse begins.
The shutter speeds for eclipse magnitudes 0.3, 0.6, 0.8 and 0.9 would then be 1/500, 1/250, 1/125 and 1/60, respectively.
<div class="MEbox1"]
<p class="MEcenter"]

(click to see larger version of table)
</div>
<p class="MEindent"]
Note that the
Exposure Guide
lists a range of different exposures for totality.
For the time being, use the row labeled "Totality: L=3" to determine your exposure.
These values will be explained in the section
For film cameras, it's important to now take your camera out of multiple
exposure mode.
Otherwise, your carefully executed eclipse picture will be superimposed
on the next picture you take.
To be safe, put the lens cap on the camera and shoot two or three frames
to verify that the film is advancing through the camera.
When the film is developed, you'll have one frame that compresses the
entire eclipse into one picture with a sequence of tiny Moon's each
reflecting a different phase of the eclipse.
<p class="MEindent"]
For digital cameras, download all the images to your computer.
Use an image editing program like Photoshop or Photoshop Elements to add all the individual image files as separate layers in one new composite file.
Finally, flatten the layers to combine the separate exposures into one.
<a name="Telephoto"]
<p class="MEcenter"]

Portrait of Totality
The total lunar eclipse of 2000 Jan 20-21 was photographed from Dunkirk, Maryland.
An AstroPhysics 120 EDT Refractor (5" F/6) and AP 2X Barlow produced a focal length of 1500mm.
The image was made on Kodak Royal Gold 100 with a Nikon N70 camera (4 seconds at f/12).
(click to see more photos)
<h3>Telephoto Photography</h3>
<p class="MEindent"]
To achieve large images of the Moon, you need to use a long telephoto lens or a telescope.
Point & Shoot cameras can be used if they have a powerful
zoom lens (6x or more).
In this case, the longer the zoom's focal length, the better.
Try shooting some photos of the Moon a few days before the eclipse to
see how big the Moon's image will be using the maximum zoom setting.
Just don't expect Point & Shoot cameras to deliver a Moon image that fills the frame.
For that, you need either an SLR or DSLR.
<p class="MEindent"]
The big advantage of SLR (film) and DSLR (digital) cameras is that they take interchangeable lenses.
In this case, a lens with a long focal length is needed to get as large an image as possible.
<p class="MEindent"]
With SLRs (film), a 50mm lens produces an image of the Moon only 0.5mm
across.
Switching to a 200mm telephoto or zoom lens, the Moon appears 1.8mm in
diameter.
This is still quite small but at least the image is recognizable.
However, there are a number of compact 500mm mirror lenses available in
the $100 to $250 price range which yield a lunar image 4.6mm in
diameter.
While this is seems like a respectable size, it still doesn't fill the
frame.
Adding a 2x tele-extender to a 500 mm lens results in a focal length of
1000mm which doubles the Moon's size to 9.2mm.
<p class="MEindent"]
Most recommendations for SLRs apply to DSLRs as well.
The primary difference is that the imaging chip in most DSLR cameras is
only about 2/3 the area of a 35mm film frame (see your DSLR's technical
specifications).
This means that the relative size of the Moon’s image appears 1.5 times
larger in a DSLR so a shorter focal length lens can be used to achieve
the same angular coverage compared to a SLR.
For example, a 500mm lens on a DSLR produces the same relative image
size as a 750mm lens on a SLR.
<p class="MEindent"]
The diagram below shows the apparent size of the Moon at six different focal lengths.
The focal lengths for SLRs are black while DSLR values are in blue.
<div class="MEbox1"]
<p class="MEcenter"]

(click to see larger version)
</div>
<p class="MEindent"]
Focal lengths in excess of 1000mm take you into the realm of the super
telephoto lens.
If you're in the market for such an item, you might consider a small
telescope instead.
The main advantage of a telescope is that you can also use it visually
with variable power eyepieces.
There are a number of brands and models in the 1000mm to 2000mm focal
length range, including the Celestron 90 and the Meade ETX.
These instruments are both compact catadioptics in the $300 to $500
price range.
The 3 1/2" Questar is renowned for both its high optical quality and
price ($3000 to $4000).
<p class="MEindent"]
These telescopes are available with equatorial fork mounts and electric
clock drives which counteract the Earth's rotation and allow you to
automatically track the Sun, Moon and stars.
A wealth of information on commercial telescopes can be obtained from
advertisers in magazines like Astronomy or Sky and Telescope.
Keep in mind that a focal length of 2500mm (1700mm for DSLRs) produces
an image of the Moon that barely fits the narrow dimension of the camera
field of view.
<p class="MEindent"]
The Moon's image size on 35mm film can be calculated for any lens by dividing its focal length by 109.
The
Field of View & Image Size Table lists the size of the Moon's image over a wide range of lens focal lengths.
The table also gives the field of view of each lens for both SLRs and DSLRs.
This is useful for planning phtotgraphy using the Star Trail and Multiple Exposure techniques.
<p class="MEindent"]
With a telephoto lens or telescope, you can capture various stages of the eclipse using the
Lunar Eclipse Exposure Guide
as a starting point for your exposures.
Bracket your exposures by making one exposure at the recommended value
and then two more at one stop (or shutter speed) overexposed and one
stop underexposed.
In most cases, this will ensure that you obtain a well exposed image.
To be extra safe, you might even bracket plus or minus two stops.
Weather conditions (fog, haze, thin clouds) may require an additional
two or three stops to achieve a good exposure.
Just remember that film and memory chips are cheap and eclipses don't
happen every month!
<p class="MEindent"]
To capture a good sequence of photos, you'll probably want to take a
bracketed series of exposures every ten or fifteen minutes.
Just make sure that you use a large enough tripod to hold you telephoto
lens firmly with as little vibration as possible.
The major challenge to lunar eclipse photography comes during totality
because there's no way to predict how bright the Moon will appear.
<a name="Bright"][/URL]
<p class="MEcenter"]

Triple Play Totality
The total lunar eclipse of 2004 Oct 28 was widely visible from the USA.
This trio of images captures the Moon at the beginning (right), middle (center) and end (left) of totality.
The composite was assembled from three separate exposures using Adobe Photoshop.
An AstroPhysics 105 EDT Refractor (4" F/6) and AP 2X Barlow produced a focal length of 1200mm.
The image was made with a Nikon D100 DSLR camera (4 seconds at f/12).
(click to see more photos)
<h3>Brightness of Total Lunar Eclipses</h3>
<p class="MEindent"]
During a total eclipse, the Moon's color and brightness can vary
enormously.
It can take on hues from bright orange, through deep red, dark brown or
even dark grey as it's brilliance ranges from bright to dark to nearly
invisible.
Although the Moon is cut off from all direct sunlight while it is in
Earth's umbral shadow, the Moon receives indirect sunlight which is
refracted through and modified by Earth's atmosphere.
Our atmosphere contains varying amounts of water (clouds, mist,
precipitation) and solid particles (dust, organic debris, volcanic ash).
<p class="MEindent"]
This material filters and attenuates the sunlight before it's refracted
into the Earth's shadow.
For instance, large or frequent volcanic eruptions dumping huge
quantities of ash into the atmosphere are often followed by very dark,
brownish red eclipses for several years.
Extensive cloud cover along Earth's limb also tends to darken the
eclipse by blocking sunlight.
<p class="MEindent"]
To successfully photograph the total phase of an eclipse, you have to be
able make a reasonable guess as to how bright a particular eclipse is.
Fortunately, a French astronomer named Dajon formulated a simple five
point scale for evaluating the visual appearance and brightness of the
Moon during total lunar eclipses.
'L' values for various luminosities are defined as follows:
<pre> L = 0 Very dark eclipse.
Moon almost invisible, especially at mid-totality.
L = 1 Dark Eclipse, gray or brownish in coloration.
Details distinguishable only with difficulty.
L = 2 Deep red or rust-colored eclipse.
Very dark central shadow, while outer edge of umbra
is relatively bright.
L = 3 Brick-red eclipse.
Umbral shadow usually has a bright or yellow rim.
L = 4 Very bright copper-red or orange eclipse.
Umbral shadow has a bluish, very bright rim.
</pre>
<p class="MEindent"]
The assignment of an 'L' value to lunar eclipses is best done with the
naked eye, binoculars or a small telescope during totality.
Use the descriptions above and select the one that best fits the Moon's
appearance.
<p class="MEindent"]
To photograph the Moon in total eclipse, you choose the exposure with the corresponding 'L' value from the
Lunar Eclipse Exposure Guide.
Keep in mind that this exposure is only a estimate.
You should bracket two or three stops over and under the recommendation.
Better yet, if your camera has a spot meter, use it to take an actual exposure reading and bracket from that point.
If you have a digital camera, check your exposures and modify them as needed.
<p class="MEindent"]
The
<h3>Future Lunar Eclipses</h3>
<p class="MEindent"]
To plan your eclipse photography, you'll need to know when upcoming
lunar eclipses will occur and the contact times of the partial and total
phases.
This information is available at [url="http://www.mreclipse.com/Special/LEnext.html]Lunar Eclipse Preview: 2001-2020[/url].
<p class="MEindent"]
The last total lunar eclipse visible from the U.S.A. occured on [url="http://eclipse.gsfc.nasa.gov/LEmono/TLE2007Aug28/TLE2007Aug28.html] Aug. 28, 2007[/url].
The next total lunar eclipse occurs on [url="http://eclipse.gsfc.nasa.gov/LEmono/TLE2008Feb21/TLE2008Feb21.html] Feb. 21, 2008[/url].
<p class="MEindent"]
Upcoming lunar eclipses visible from the U.S.A. include
Phases of the 2000 Total Lunar Eclipse
This photo is centered on Earth's umbral shadow and shows
various stages of the total lunar eclipse of 2000 Jan 20-21.
The composite was made in Adobe Photoshop from nine separate photos
shot on Kodak Royal Gold 100 with a Nikon N70 camera
AstroPhysics 120 EDT Refractor (5" F/6) and AP 2X Barlow (focal length of 1500mm)
(click to see more photos)
<div class="MEcopyright2"]
<a name="resources"]
<h2>Eclipse References</h2>
- Astrophotography Basics, Kodak Customer Service Pamphlet P150, Eastman Kodak, Rochester, 1988.
- Harrington, P., Eclipse! The What, Where, When, Why, and How Guide to Watching Solar & Lunar Eclipses, John Wiley & Sons, 1997.
- Pasachoff, J. M., and Covington, M., Cambridge Guide to Eclipse Photography, Cambridge University Press, Cambridge and New York, 1993.
- Reynolds, M. D. and Sweetsir, R. A., Observe Eclipses, Astronomical League, Washington, DC, 1995.
- Sherrod, P. C., A Complete Manual of Amateur Astronomy, Prentice-Hall, 1981.
<h2> Lunar Eclipse Predictions </h2>
[list][*][url="http://www.mreclipse.com/Special/LEnext.html]Lunar Eclipse Preview: 2001-2020[/url][*][url="http://eclipse.gsfc.nasa.gov/OH/OH2005.html] Eclipses During 2008[/url] [i]Observer's Handbook 2008[/i][*] [url="http://eclipse.gsfc.nasa.gov/LEcat/LEcatalog.html]Five Millennium Catalog of Lunar Eclipses: 2000 BCE to AD 3000 CE[/url][*][url="http://eclipse.gsfc.nasa.gov/LEhistory/LEhistory.html] Lunar Eclipses of Historical Interest[/url][/list]
<h2> Lunar Eclipse Photographs </h2>
[list][*][url="http://www.mreclipse.com/LEphoto/LEgallery1/LEgallery1.html] Lunar Eclipse Photo Gallery 1 [/url][*][url="http://www.mreclipse.com/LEphoto/LEgallery1/LEgallery2.html] Lunar Eclipse Photo Gallery 2 [/url][*][url="http://www.mreclipse.com/LEphoto/TLE1982Jul/TLE1982Jul.html] Total Lunar Eclipse of 1982 Jul 06 [/url][*][url="http://www.mreclipse.com/LEphoto/TLE2000Jan/TLE2000Jan-1A.html] Total Lunar Eclipse of 2000 Jan 20-21[/url][*][url="http://www.mreclipse.com/LEphoto/TLE2000Jul/TLE2000Jul.html] Total Lunar Eclipse of 2000 Jul 16 [/url][*][url="http://www.mreclipse.com/LEphoto/TLE2004Oct/TLE2004Oct-1A.html] Total Lunar Eclipse of 2004 Oct 27-28[/url][/list]
<h2> Other Links </h2>
[list][*][url="http://www.mreclipse.com/Special/LEprimer.html] Lunar Eclipses For Beginners[/url][*][url="http://www.mreclipse.com/Special/SEprimer.html] Solar Eclipses For Beginners[/url][*][url="http://www.mreclipse.com/SEphoto/SEphoto.html] How to Photograph a Solar Eclipse[/url][*][url="http://www.mreclipse.com/Special/photo.html] Index to Eclipse and Astronomy Photographs[/url][*][url="http://www.mreclipse.com/Store/Picks/Picks.html] MrEcipse's Picks[/url] - recommendations on cameras, tripods, telescopes, and more[/list]
</div>
<div class="MEcopyright2"]
<h4>Copyright Notice</h4>
All photographs, text and web pages are © Copyright 2007 by Fred
Espenak, unless otherwise noted.
All rights reserved. They may not be reproduced, published, copied or
transmitted in any form, including electronically on the Internet or
WWW, without written permission of the author.
The photos have been digitally watermarked.
The photographs may be licensed for commercial, editorial, and educational use.
Contact Espenak (at [url="http://www.mreclipse.com/Special/contact.html] MrEclipse[/url]) for photo use in print, web, video, CD and all other media.
</div>
<h3 class="ctr"]Return to: [url="http://www.mreclipse.com/MrEclipse.html]MrEclipse Main Page[/url] </h3>
<p class="ctrDble"]WebMaster: MrEclipse
Last revised: 2008 Feb 26
-
Senior Member

Re: Lunar Eclipse Tonight
After doing some reading--it looks like the eclipse may end up being fairly boring, i.e. The moon may in fact get dark and gray rather than the orange we are all hoping for---they say that the illumination may be reduced 50,000-100,000 times. But what the heck--I plan to stay up and give it a shot anyway. Hoepfully, someone else is following this string so we can bounce ideas off of each other. I do have a few decent pictures of the moon, but I am not sure how much those apply considering the reduced illumination of the eclipsed moon. Here are my starting parameters:
7D+100-400L@400 (no Extender)
White balance-sunlight
ISO-100 (will increase depending on meter/shutter speed)
Aperture 6.3 for max sharpness
Shutter speed 400 (maybe faster considiring the movement of the moon)
sturdy tripod
shutter release
mirror lock up
Now, these settings work for normal full moon shots---but I anticipate having to adjust dramatically for the eclipse since it is supposed to be much darker. This may be a good thing since the moon is normally much brighter than surrounding clouds.
Also, since I dont have enough lens to get a full frame moon shot, I am hoping for a few slow moving clouds to add some character to the shot..
Any other ideas, comments or suggestions is appreciated.
Bob
-
Re: Lunar Eclipse Tonight
Bob
In our part of the world, Central US, the moon is going to be directly above us or just a little past. Maybe if we had planed ahead we could have bought tickets to Guam and we could have caught it rising in full eclipse. So other than clouds or maybe a water tower, it looks like our composition choices will be limited.
In the past I have set up just like you described, using Live View in Manual Mode. I just set Aperture, and ISO and take many pictures adjusting shutter speed until I hit the right exposure. Thats the good thing about digital, we know what we have right then. I suppose I will be doing the same tonight. Its a good thing it will last for some time, it will give a person some time to adjust.
-
Re: Lunar Eclipse Tonight
Here's a moon shot at a high ISO.
7D: 300mm f/2.8L IS with 2X extender @600mm, f/8, 1/1000sec, ISO 3200, tripod mounted, medium crop.
Rich
-
Re: Lunar Eclipse Tonight
Hi Richard-
Why did you use such a high ISO on that shot? You had a tripod. I
 Posting Permissions
- You may not post new threads
- You may not post replies
- You may not post attachments
- You may not edit your posts
-
Forum Rules


 Reply With Quote
[/url], <br />
[url="http://eclipse.gsfc.nasa.gov/LEplot/LEplot2001/LE2010Jun26P.GIF] Jun. 26, 2010 (partial)[/url], <br />
[url="http://eclipse.gsfc.nasa.gov/LEplot/LEplot2001/LE2010Dec21T.GIF] Dec. 21, 2010 (total)[/url], <br />
[url="http://eclipse.gsfc.nasa.gov/LEplot/LEplot2001/LE2012Jun04P.GIF] Jun. 04, 2012 (partial)[/url], <br />
[url="http://eclipse.gsfc.nasa.gov/LEplot/LEplot2001/LE2014Apr15T.GIF] Apr. 15, 2014 (total)[/url] and <br />
[url="http://eclipse.gsfc.nasa.gov/LEplot/LEplot2001/LE2014Oct08T.GIF] Oct. 08, 2014 (total)[/url].<br />
<br />
<p class="MEcenter)