-
What is the ideal number of megapixels?
Most statements about megapixels understate their importance. For example, it is often stated that an 8x12 print does not benefit from having more than a 8.64 MP camera. The ideal number of megapixels is a lot higher than most photographers think it is.
High resolution is not necessarily a requirement for a good photo. I have enjoyed many beautiful 20x30 prints that were made with less than 2 MP. Most film theaters only achieve resolution between 0.4 MP and 0.9 MP (some digital ones are up to 2.4 MP), yet people sit close to the 50 foot screens and enjoy the cinematography anyway.
I'm not really interested in trying to determine how much resolution can be taken away before the print is completely ruined by lack of detail. Rather, I'd prefer to find the point where any additional resolution contributes no discernable improvement to the display.
There are many factors, conditions, and circumstances that affect the optimal number of megapixels.
* Display size
Given the same resolution per area, a larger display (e.g. 20x30) can benefit from more megapixels than a small display (e.g. 4x6).
* Display resolution
Given the same display size, a high resolution display, such as a 360 ppi, can benefit from more megapixels than a low-resolution display (e.g. 72 ppi).
* Cropping for aspect ratio
This one is pretty self-explanatory, but sometimes it is forgotten. For example, an 8x10 at 360ppi is 10.37 MP. But a DSLR has a different aspect ratio than 8x10: 2:3 vs 4:5. After you crop a 10.37 MP DSLR to 8x10, it only has 8.64 MP left. A 12.44 MP DSLR is needed to get a 360 ppi 8x10.
* Cropping for viewfinder inaccuracy
Most photographers cannot afford a DSLR viewfinder that is 100% accurate. And all DSLR can get out of tolerance or miscalibrated. The image seen through the viewfinder will be slightly off from the saved image. The difference may contribute a few extra percent to the amount an image is cropped. Cropping just 3% off of two sides of the photo turns a 6 MP image into 5.6 MP and a 21 MP image into 19.8 MP.
* Cropping for composition
This is of course the most well-known benefit of more megapixels. I think many people don't realize just how much resolution is lost by cropping small amounts. For example, cropping just 10% off each side cuts 15 MP down to 9.6MP. I always strive to get the composition just right before I snap the shutter, but I still find myself cropping by more than 10% on a routine basis. I change my mind many times after the photo enters the darkroom, and I try a variety of crops.
* Higher contrast from the OLPF
The OLPF (optical low pass filter) anti-aliases the sensor image by reducing contrast. If it were a perfect filter, it would pass 100% contrast all the way up until the Nyquist frequency (what is seen in 100% crop), then drop to 0% contrast. In real life, it has a curve, so that it starts reducing contrast before it gets to the pixel level.
Since smaller pixels have Nyquist at a higher frequency, the MTF curve of the OLPF can be built so that it doesn't affect the image as much. If you compare the 8x12 of an 8 MP camera vs an 8x12 of a 15 MP camera, you'll see the difference in contrast. Contrast is one of the most striking aspects of an image, so this can have quite a noticable effect.
Generally, most of the contrast-reducing effect of the OLPF can be negated by increasing spatial resolution by about 30%.
* Lower visibility of aliasing artifacts
The Optical Low Pass Filter (OLPF), or Anti-Alias filter, is an optical filter on the image sensor that is designed to reduce aliasing artifacts by blurring out the smallest, finest details that the sensor should not record.
As the number of megapixels are increased, aliasing artifacts move to higher and higher spatial frequencies. That is, they get smaller and smaller for a given print size. At some point, they will mostly cease to be visible. That is another benefit of higher megapixels.
Aliasing artifacts are explained in this metaphor. In real life, when you pour two liters of water into a one liter container, water spills out and makes a mess. But camera design is different: when you pour two liters of water into a one liter container, the water folds back on itself and corrupts the entire container. The amount of water is the level detail (spatial frequency), and the volume of the container is the number of megapixels in the camera. Aliasing is the corruption. Anti-aliasing filters reduce detail down to a level that can fit within the pixel resolution.
Aliases are a certain kind of image artifact; they can be described as jaggies, stair-stepping, unwanted sparkling, "snap to grid", wavy lines, bands, patterns, fringing, popping, strobing, noise, or false detail. Some photographers desire aliasing artifacts and describe them with positive terms such as ”crunchiness”, ”sharpness”, etc. Other photographers perceive the artifacts as an unnatural, unwelcome ”digital” look. The only aliasing artifact that is universally disliked by all photographers is moiré.
Here is an image that demonstrates aliasing artifacts, created by John Sheehy:
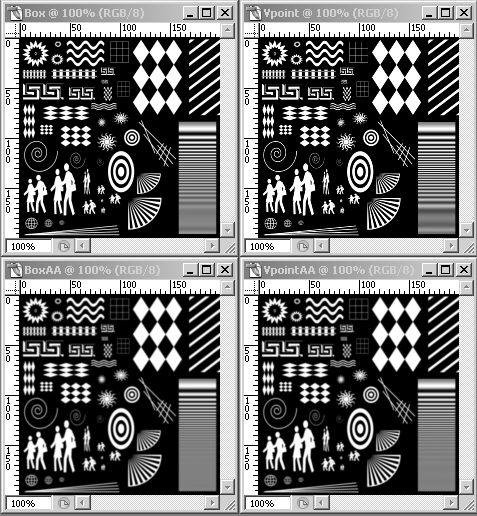
One can see how the anti-aliased images are more blurry, with no sharp contrast from one pixel to another. The non-AA images, on the other hand, have more contrast at the pixel level (Nyquist).
Here is an example of Moiré, which is the worst kind of aliasing artifact:

It is from this web site with a great explanation of aliasing:
http://www.wfu.edu/~matthews/misc/DigPhotog/alias/
Aliasing is also described in this SD9 review:
http://www.imaging-resource.com/PRODS/SD9/SD9A12.HTM
* Horizon correction (rotation)
We strive to get the horizon level at the time of the shot, but sometimes an image still requires this correction, especially in fast-paced shooting. But even a slight rotation causes a big drop in resolution or the addition of a lot of artifacts. Having higher resolution allows this correction to occur without any negative effects on image quality of the final display.
For example, say you have two 12 MP images: one that is level already, and one that was slightly off and then corrected in post. If you print both at 4x6, they may look the same. But print both at 12x18 and the one that required correction will look worse.
* Chromatic Aberration, Distortion, and Perspective/Anamorphosis correction
There are several types of lens aberrations that can be corrected easily and automatically in post processing. If the camera resolution is close to the display resolution, then applying these corrections results in reduced resolution, poor contrast, and/or the introduction of artifacts. But if the camera resolution is sufficiently higher than the display, these aberrations can be corrected without those problems.
Anamorphosis is the natural consequence of normal (rectilinear) lenses, but there are many images where we will want to correct it. See this URL for a demonstration of this and other aberration corrections:
http://www.dxo.com/us/photo/dxo_optics_pro/optics_geometry_corrections
* Fewer de-Bayer artifacts
De-Bayer artifacts such as mazing occur with some combinations of demosaic algorithms and images, and are usually exacerbated by aliasing. You can see examples of it here:
http://www.rawtherapee.com/RAW_Compare/
If the resolution is high enough, such artifacts will be at a level beyond what can be seen in the print.
* Faster demosaic algorithms
The reason why current de-Bayer interpolation algorithms are so slow is that they attempt to extract the maximum possible amount of detail through time-consuming context analysis and other techniques. But when less resolution is needed, a different demosaic method can be used, particularly for regular factors (2X linearly).
It's actually *faster* to demosaic 24 MP into a 6 MP RGB than to demosaic a native 6 MP itself, and the quality is higher. If the resolution of the camera is sufficiently higher than what's needed, then those types of algorithms can be used, resulting in faster post-processing times.
* Future Proofing
There is also the benefit of having a high resolution original to come back to years later, like a film negative. Whatever size, crop, or post-processing you happen to be using today, in the future you may want to revisit the photograph.
* Color resolution
Bayer cameras sample chroma at half the resolution of luma. This can be clearly seen in charts and test shots, but does not have a noticable effect in most real life images. Some images, however, will have high frequency color detail that can be noticed with full chroma sampling. For Bayer, that means quadrupling megapixels.
* Printer resolution
Some printers are capable of 250ppi, others 360ppi.
* Paper resolution
Different types of paper affect resolution as well. On some papers, the ink spreads over a wider area, and so has lower resolution.
* Viewing distance, environment, and visual acuity
Viewing a print or display from accross the room will reduce the effectiveness of higher resolutions compared to close inspection from just a few inches. A viewer that is not wearing their glasses will not get the same benefit from higher megapixels as the one that has 20/20 vision. Also, acuity tends to get worse in dim viewing environments.
* Diminishing returns
There are many factors that can cause diminishing returns. Camera shake, subject motion, lens aberrations, diffraction, etc.
* Examples
To help illustrate the concept, let's examine a few scenarios and see how many megapixels are needed to reach the ideal.
* 8x10 print example.
This is how most people see an 8x10 print. We'll assume a middling printer/paper combination that can only achieve 250ppi.
* [5.0 MP] Display resolution (8x10, 250ppi)
* [6.0 MP] Cropping for aspect ratio: 1.5 -> 1.78.
All of the other factors are ignored or unused:
* Cropping for viewfinder inaccuracy: none.
* Cropping for composition: none.
* Higher contrast from the OLPF: none (leave reduced contrast).
* Reduce aliasing, demosaic: none.
* Full color resolution: no.
* Horizon correction (rotation): none.
* Aberration correction: none
* Faster demosaic algorithms: unneeded.
* Future Proofing: unneeded
In this case, the photographer doesn't care about increasing contrast from a different OLPF, or reducing aliasing/demosaic artifacts.
* Different 8x10 print example
Here is another illustration that makes totally different assumptions. This time a high end 720ppi printer is used, but the printer+paper combination is only capable of achieving an actual resolution of 400ppi. All the post processing options apply in this case:
* [12.8 MP] Display resolution (8x10, 400ppi, very close viewing distance)
* [15.4 MP] Cropping for aspect ratio: 1.5 -> 1.78.
* [16.3 MP] Cropping for viewfinder inaccuracy: 3% on two sides.
* [23.5 MP] Cropping for composition: 10% on four sides.
* [39.7 MP] Higher contrast from the OLPF: maximize contrast
* [67.0 MP] Reduce aliasing, de-Bayer artifacts to nothing.
See how fast it adds up? 67 MP is the maximum needed resolution for this circumstance.
* Typical film theater example.
The display size is 50 feet and viewing distance can be very short in the front row. But the resolution is only 1 MP based on average film theater measurements. The viewing environment is also dark, which can reduce the visual acuity of the audience. No corrections or cropping were needed in post.
* [1.0 MP] Display resolution
* [1.1 MP] Cropping for aspect ratio: 1.5 -> 1.78.
* [1.1 MP] Cropping for viewfinder inaccuracy: none.
* [1.1 MP] Cropping for composition: none.
* [2.1 MP] Higher contrast from the OLPF
* [2.4 MP] Lower visibility of aliasing artifacts
* [2.4 MP] Fewer de-Bayer artifacts
* [2.4 MP] Horizon correction (rotation): none.
* [2.4 MP] Aberration correction: none
* [2.4 MP] Faster demosaic algorithms: unneeded.
* [2.4 MP] Future Proofing: unneeded
In that case, there is no benefit to having more than 2.4 MP.
* Conclusion
Resolution is not the most important aspect of a photograph. But if you want to get the maximum contrast and resolution from your prints or displays, the optimal number of megapixels might be higher than you think.
 Posting Permissions
- You may not post new threads
- You may not post replies
- You may not post attachments
- You may not edit your posts
-
Forum Rules


 Reply With Quote